BlackBerry are key communication tools in today's worldwide business market.
Mobile BlackBerry development India's can be your right choice for BlackBerry application development
This tutorial will teach you the balckberry programming and advance concepts in BlackBerry application development.
Tutorial:
Hello BlackBerry:
The balckberry java plug in for eclipse provides a basic template which is used to create a basic app.
To create your own app you need to customize the code in the template or you can create your own app with empty template .
Steps to create HelloBlackBerry App:
In blackberry java plug in for eclipse click Windows > Open Prespective >other and BlackBerry application development.
- From the menu >click new> BlackBerry Project.
- In the project name field type HelloBlackBerry.
- In the BlackBerry Project dialog select create new project in workspace.
- Click next.
- Click next.
- Select the HelloBlackBerry template.
- Click finish.
Simple List View
- From the menu >click new>SimpleListDemo
- In the method SimpleListDemo we want to push a new screen called SimpleListScreen as shown in the figure
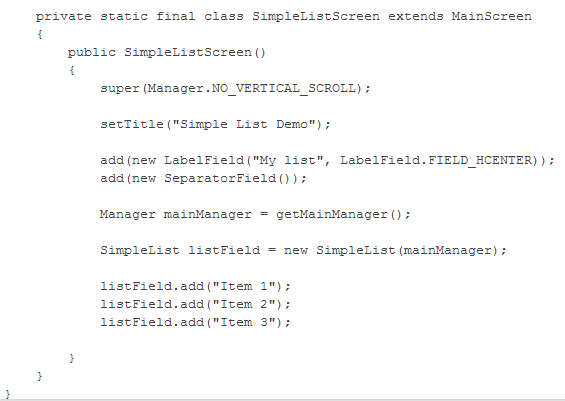
3.Then create a private class for the SimpleListScreen which extends the Main Screen as shown below
4.After creating the private class you have to code the operation in SimpleListScreen to be held as shown above.
5.After finishing the method just save it and run you will get a output in the simulator as shown in the above session.
Download Source Code
Rich List Field:
Steps to create RichList View:
1.From the menu >click new>RichList
2.As shown in the above tutorial assign a push screen to push a new MyScreen in the method.
3.Add the images to the resource folder whic we use in the rich list
3.Then create a private class MyScreen which extends MianScreen.
4.Inside the method MyScreen set the title and create a label and name it as shown below
5.Add a new separator field and create a MainManager.
6.Create a new RichList and assign the images to the list through the Bitmap as shown below
7. Now add each object to the list with the requierd field as shown below
8.Save it and run you can see the rich list view in the simulator as shown above.
Download Source Code


superrrrrr anna
ReplyDeleteNEHRU SETHU:thanks nehru
ReplyDeleteGREAT BRO UR BLOG IS AMAZING
ReplyDeleteBavithra Saravanan:thank u
Delete